Posts

Showing posts from March, 2022

TARGET AUDIENCE

Image
Working out Target Audiences Pearl and Dean is a company that sells advertising space for UK cinemas. They analyse potential movie audiences, in order to calculate where is best to show the adverts (in order to reach the right target audience). They analyse the audience in terms of gender, social grade and age. and you can access the information online. I used some of this information to estimate the target audience for my film. 'Don't Worry Darling' - Directed by Olivia Wilde (2022) The analysis of the film 'Don't Worry Darling', shows that the target audience is quite evenly split between genders. It also appeals to a younger audience, with only 17% of people above 45 being likely to watch the film. 64% of what is considered 'upper class' make up the audience for this film. As this film has a similar concept to our film opening, I used this research as a basis to figure out my own target audience. Similar to 'Don't Worry Darling', I bel...

ALTERNATE ENDING

Image
Inspired by my chosen song, 'Run Rabbit Run', I experimented with adding a low opacity layer of gun shooting over the lyrics of "bang bang bang bang". This added to the ominous tone of the film, and gave more insight into the murder of the person in the back of the car. In the end I chose not to include this detail, as I didn't like the sound accompanying the overlay. Without any sound effects the footage seemed underwhelming, however the version with gunshots (which can be seen below), was unnatural and I felt it took away from the rest of the film.

PROGRESS #4

Image
Final adjustments Once I finished with footage, colour grading and sound, I started adding in credits. When I submitted my rough cut I was using placeholders to map out which shots I wanted to place credits over, and rough positioning. I finished them off using a combination of Adobe After Effects and Final Cut Pro. I also responded to feedback from the class, and made some adjustments to the colour grading and added in some of the diegetic sounds I had missed. I experimented with adding a few extra effects like a cross fade between a shot of the drain and the lady putting on her necklace, as a reference to "Psycho" (1960).  

PROGRESS #3

Image
Sound The next step after adding the footage and colour, was to add the sound. I started with diegetic sounds, and evening out background noises. As the microphone didn't turn on properly for part of the shooting, I had to use a sound recorder to recreate some of the noises. I selected and favorited the sections of the sounds I wanted to use - similar to what I did with the footage - so I could just drag and drop the correct sounds instead of searching for what I wanted. I also named each recording so I knew what I was listening to, and what shot it needed to go with.

PROGRESS #2

Image
Colour grading After gathering all the footage, I began the process of colour grading. I predominantly used colour curves and simple tools to adjust the Saturation and exposure of the shots to bring out the colours and contrast. We shot the footage in very neutral tones, to allow for colour grading. On top of this, the day was quite overcast which meant we had to digitally adjust the lighting. Below you can see some screenshots of me using the program - Final Cut Pro - to colour grade some of the footage. I found that using colour curves could change the footage quite drastically, so I had to make very small changes on the curve and move individual point to get the tone I wanted.

PROGRESS #1

Image
Assembling clips Once we finished filming, I planned to assemble all the clips and put them in their rough order, before adjusting the timing and positions. Below, is the video once the clips were put together in their final order. I started out by going through the footage and finding the useable clips. Some takes were test shots, or ruined by background sounds/camera wobbles etc. By highlighting the footage that was good enough to end up in the film, it cut down a lot of time when I started putting clips in their order as I didn't have to search through waste footage for what I wanted. You can see the in the clips above, I started to add clips together and work out how long each shot should be.

CHOOSING FILM TITLE!!!

Image
Clementine and I decided to name our film 'Red Herring', which is a device that is designed to steer the audience to a false conclusion - a trope that is commonly used in crime thrillers and dramas. We decided o name our film this, as we use in our film by misleading the audience with the cooking scene and the romantic imagery, before revealing a dead body and adding an ominous twist. It also gives foreshadowing towards the events in the movie, and helps establish the movie as a Thriller. The term also refers to a clue or piece of information that is misleading, which, in our film, is the representation of the couple. Clementine and I also wanted our film to have a relatively simple title, giving a clue towards the the narrative of the film. We thought that this title fit, especially as we used a lot of red imagery, and the title seemed match the general tone we created.. 

AFTER EFFECTS

Image
  Animating Credits For animating my credits, I used Adobe After Effects for the first time. This involved watching YouTube tutorials, and asking for advice from my teacher. I was able to learn how to use the Roto-Brush tool to create layers, and place overlays on top of my creates (so they interacted with the props in my shots). I also pinned my credits to a specific object in the shot, so that as the camera moved they stayed in place. This added some interest to my credits and allowed to expand my visual effects skills.  Different layers within the shots The car and motorbike highlighted, creating a layer so they move on top of the credits

ROUGH CUT

Image
Rough Cut Our teacher decided it would be a good idea to show our progress so far to class, so we would be able to reflect on our feedback and make improvements to the film. At the stage where we downloaded the rough cuts, I had yet to add sounds, and the credits were used as placeholders rather than functioning credits. Clementine and I had decided to edit our footage separately, however we chose to present my version to the class as I had gotten slightly further along. Feedback I mainly need to add more diegetic sounds and make adjustments to the credits. I had been considering using after effects to animate a few of the credits, and the class agreed with this idea as it would add some more points of interest. As you can hear, the music in the rough cut abruptly cuts out. Clementine and I had been experimenting with different sounds to see how they would sound with the foota...

SOUND

Image
Inspiration We looked at sound and music used in film openings for Psychological thriller such as "Panic Room" (2002), "The Shining" (1980) and "The Silence of The Lambs" (1991). The music in The Silence of the lambs uses low pitch horns to play the melody which releases a diminished sound that creates a feeling of unease. Similarly, The Shining uses brass instruments as well as unsettling chimes and other percussion instruments to create a disturbing atmosphere. Panic Room also uses horns playing at a low pitch, creating an ominous build up to the start of the movie. However, Clementine and I decided to go for a completely different approach. Inspired by movies such as "Reservoir Dogs" and "A Clockwork Orange", which use upbeat songs that contrast the dark themes of the film. This adds a sinister tone to the film and the music does not match the imagery at all.  Experimentation ...

FONTS

Image
  Experimentation Before choosing my font, I looked at movie titles for popular thriller films. I found thriller movies generally use fonts with very straight lines, rather than cursive - creating a bold look. I wanted to keep my credits fairly conventional, and not too distracting from the footage in my film. This is because I wanted the red imagery to stand out, and I preferred my audience to be disturbed by the imagery rather than distracted by the credits. As you can see above, Thriller credits tend to be written all in capital letters to make a striking impression. I chose the font Heiti-SC (as seen below) as it fit my criteria for my font choice. In some shots I used a 3D text effect to add some interest to the credit, especially when the background did not have an obvious subject. I did this using Final Cut Pro, however I also used Adobe After Effects to made more interactive credits. Final Credit, 3D Text effect with Heiti-SC font made with Final Cut Pro 3D text effect with...

PRODUCTION

Image
  Preparation The day of filming, a few hours before we met up, Clementine and I called and I made a quick checklist to make sure we had everything prepared so as not to hold up the filming once the actors arrived. We prepared the gimbal (finding the right balance for the camera), as it can take a long time to make sure it is evenly balanced and didn't want to take up too much time during production setting up equipment. Behind the scenes

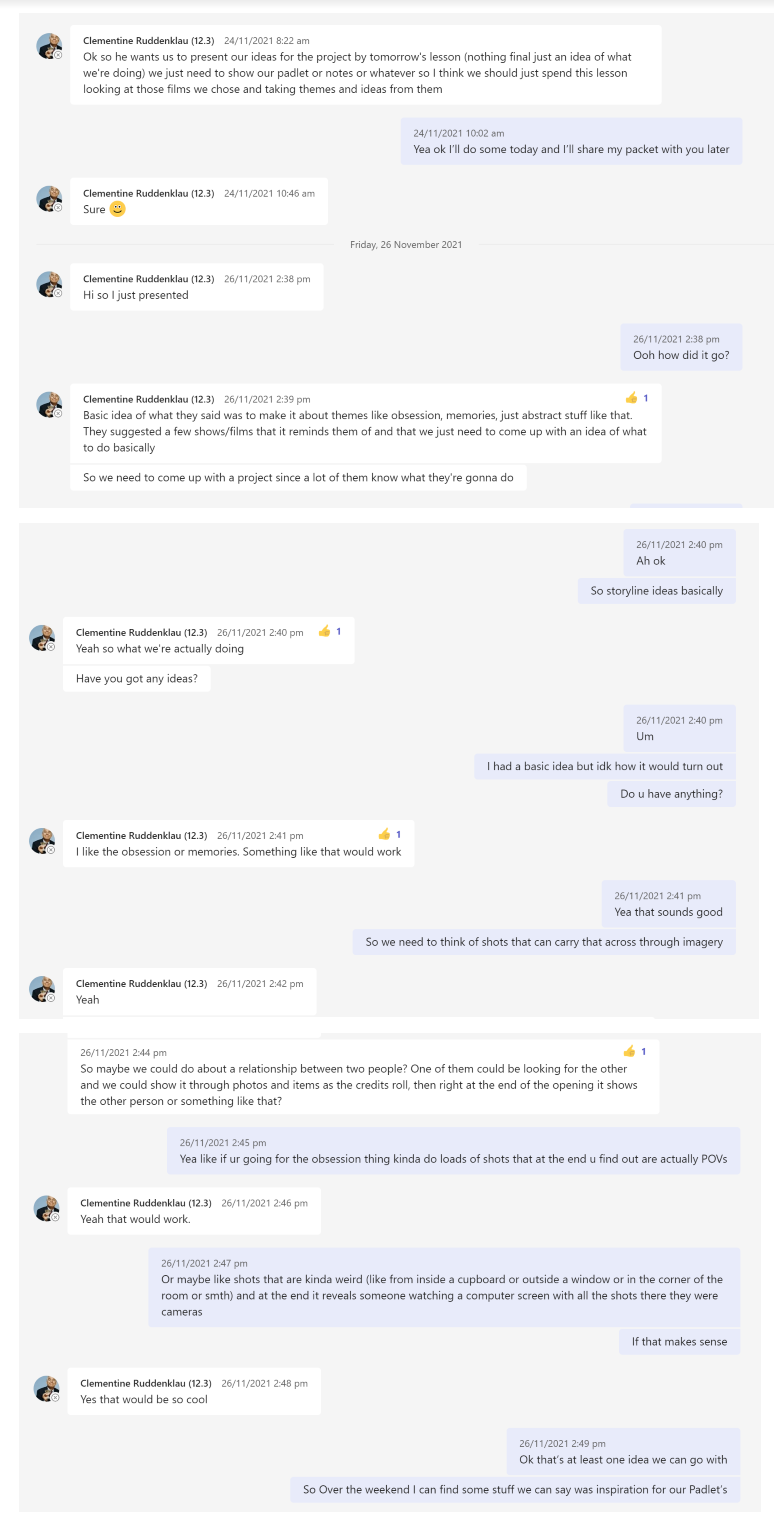
COMMUNICATIONS

Image
  Discussions Due to complications such as COVID, travelling over Christmas, and other absences, Clementine and I were forced to find other ways to communicate. We used a variation of different texting applications, as well as various calls to check in. This forced us to develop our organizational skills and learn to coordinate with each other. At times where we were in different time zones, we had to adapt our communications system to ensure we were getting everything done. Padlet Initial Ideas Scheduling Sound Costumes Filming day